The Anbox Cloud Appliance is not yet available from the Google Marketplace. However, you can install the Anbox Cloud Appliance snap on a Google Cloud instance by using this guide.
The entire deployment process will take 20-30 minutes, depending on the selected hardware and the network conditions.
Currently, Anbox Cloud requires support for 32-bit architecture. Since T2A ARM instances are not available with 32-bit support, the T2A instance family on Google Cloud cannot be supported by Anbox Cloud. See Google’s documentation on T2A limitations for more information.
Prerequisites
Before starting the procedure,
- Check the hardware requirements for the Anbox Cloud Appliance here.
- Make sure that you have a Google Cloud account and a project on Google Cloud to create the virtual machine.
- If you wish to use your own Ubuntu Pro subscription, ensure you have the Ubuntu Pro token for your Ubuntu Pro subscription. If you wish to use the Ubuntu Pro subscription offered by Google Cloud along with the virtual machine, skip this prerequisite.
Virtual machine setup
To start the installation, you must create and configure a virtual machine:
1. Create a virtual machine
Log in to Google Cloud and select the project for this deployment. Select VM instances > Create Instance > New VM instance.
2. Configure basic settings
- Name - Name of the virtual machine instance
- Labels - Organisational labels to keep track of your resources on Google Cloud
- Region and Zone - The geographic location where your resources are run and your data is stored
- Machine configuration, Series, Machine type and Display device - Select a machine configuration that matches the hardware requirements. If your requirement includes GPUs, select the GPU-optimised machine configuration. For example, an NVIDIA L4 GPU. You can select the recommended preset machine type or define a custom type with additional cores and memory for an added cost.
Most of the configuration depends on your deployment and its location. For the settings that are not mentioned in this guide, you can choose to proceed with the default options or see Google’s documentation to customise your virtual machine on Google Cloud.
3. Configure disks
Configure the boot disk by selecting Boot disk > Change to choose the operating system and boot disk size.
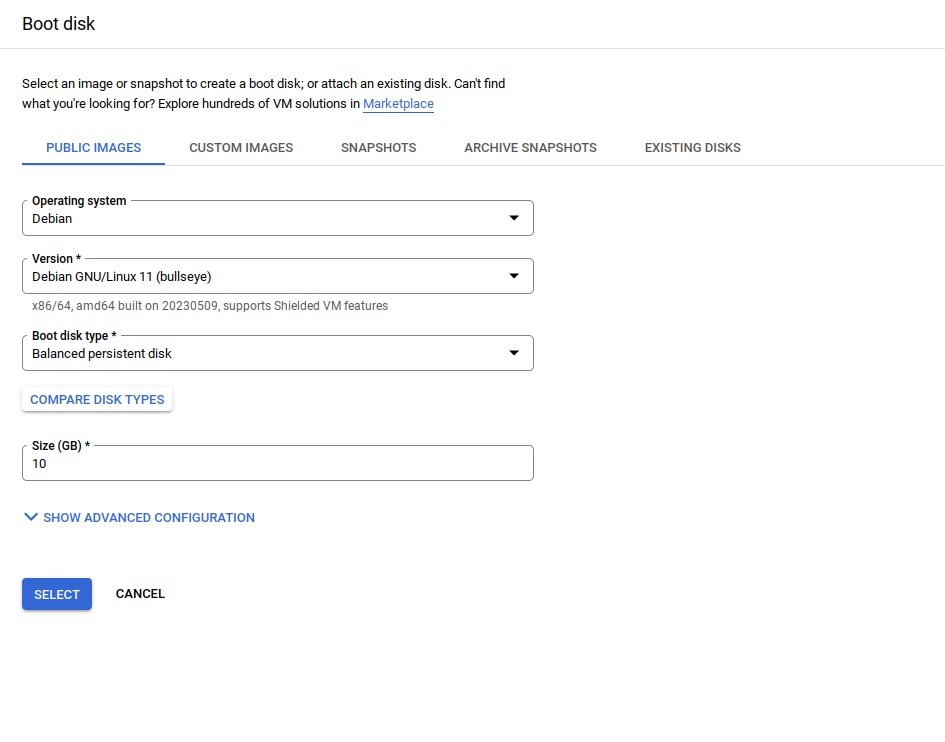
Select the operating system. Google Cloud has two options - Ubuntu and Ubuntu Pro. If you have an Ubuntu Pro subscription already, you can choose Ubuntu and attach your subscription manually. If you don’t, you can choose the Ubuntu Pro option which will include a Ubuntu Pro subscription through Google Cloud.
Remember that choosing the Ubuntu Pro option will impact your pricing. Google Cloud provides the resource details and associated costs in the Pricing summary section on the Create an instance page.
Select the latest Ubuntu image for the architecture that you want to use. For example, Ubuntu 22.04 LTS Pro Server for Arm64.
Define your preferred boot disk size. We recommend allocating at least 100 GB of disk size.
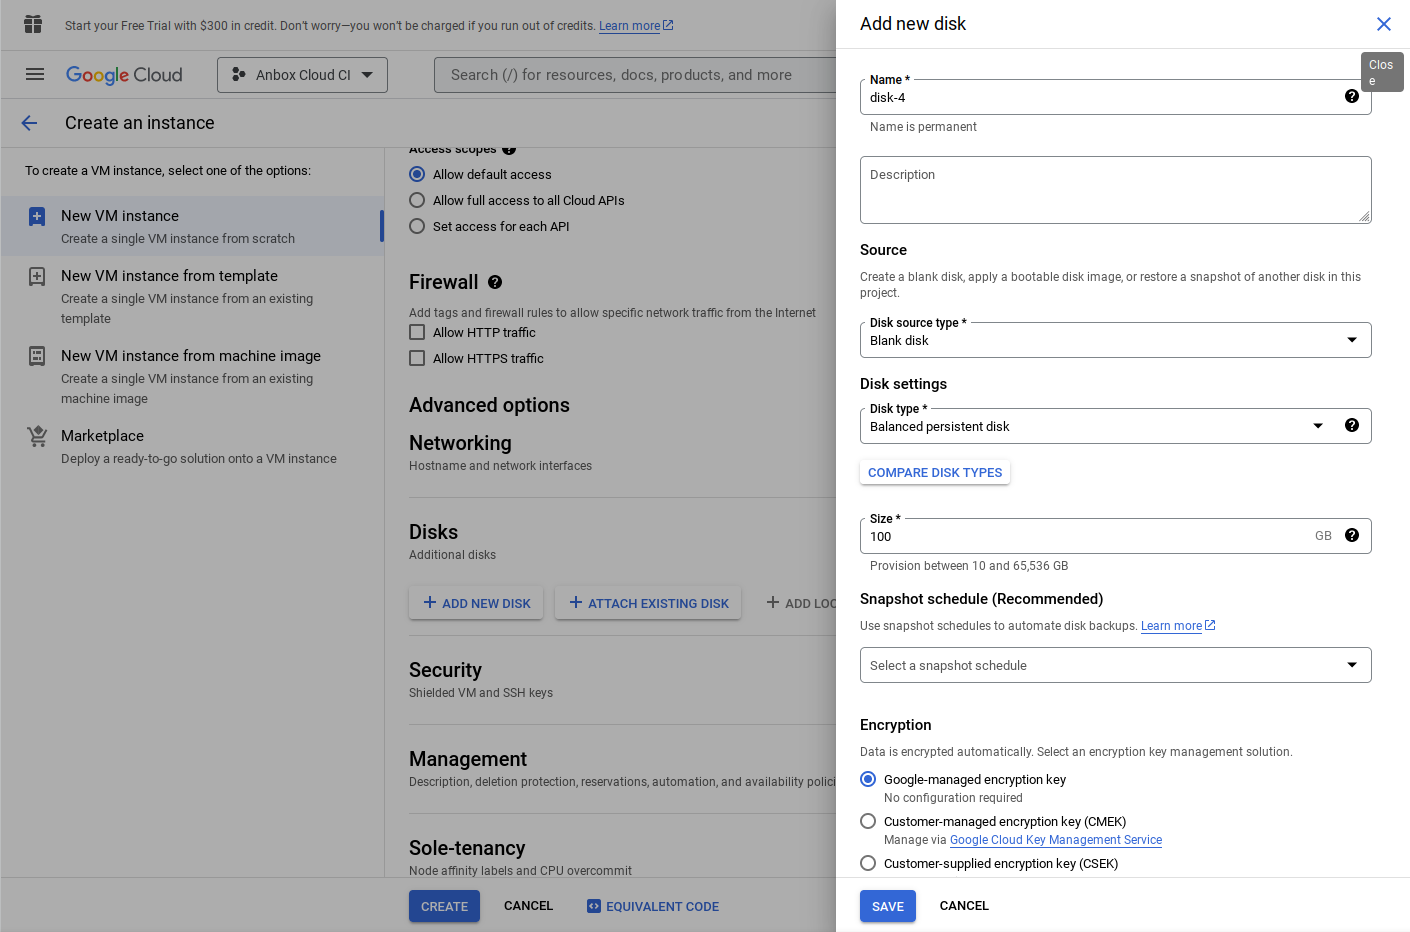
For Anbox Cloud Appliance, adding an additional disk is recommended for efficient instance storage. Under Advanced Options > Disks, Select Add new disk. Add a disk name and choose the disk size as 100 GB. For the other fields, you can choose your preferred value or proceed with the default values.
4. Configure firewall mapping
There are two ways to map the firewall rules to the virtual machine in Google Cloud:
Google service account - If you want to use a service account to map your firewall rules to the virtual machine, you can use the default service account with default access scopes under the Identity and API access section. This service account will be used when creating a firewall rule.
Specified target tags - If you want to use specified target tags to map your firewall rules to the virtual machine, assign a unique network tag under Advanced options > Networking > Network tags. This network tag will later be used while creating a firewall rule.
For more information, see Google’s documentation.
5. Launch the virtual machine
Select Create to create the virtual machine on Google Cloud. For additional information on creating a virtual machine in Google Cloud, see Google’s documentation.
Firewall setup
Before installing Anbox Cloud on the virtual machine, you should set up a firewall to control the incoming and outgoing traffic to your virtual machine. From the navigation menu, select VPC network > Firewall. Select Create firewall rule.
You can create a firewall rule based on your networking requirements following Google’s documentation. The following is an example firewall rule to enable access to the Anbox Cloud Appliance dashboard once the appliance is installed on the virtual machine.
Name : anbox-cloud-appliance
Logs : Off
Network : default
Priority : 1000
Direction of traffic : Ingress
Action on match : Allow
Targets : Specified target tags
Target tags : foo
Source filter : IPv4 ranges
Source IPv4 ranges : 0.0.0.0/0
Second source filter : None
Destination filter : None
Protocols and ports : Specified protocols and ports
    TCP ports : 80,443,10000-11000
    UDP ports : 5349,10000-11000,60000-60100
The target tag foo will be used as the network tag in the virtual machine settings. This tag should match the network tag of the virtual machine.
If you want to use the service account to map the firewall rule to the instance, choose Targets as Specified service account and use the service account configured in the virtual machine.
Select Create to create the firewall rule.
Connect to the virtual machine using SSH
On the virtual machine instance page, connect to the instance using SSH. See Google’s documentation for more information.
Finish the installation
To complete the installation:
-
Install the Anbox Cloud Appliance on the virtual machine.
Note:If you choose Ubuntu Pro as your operating system, you can ignore the step in the installation instructions that guides you to attach your machine to the Ubuntu Pro subscription as the subscription is included with the Google Cloud resources. You can check the status of the Ubuntu Pro subscription by running
pro status. -
Initialise the appliance.
-
Register your Ubuntu SSO account with the appliance dashboard.
If you are not already familiar with how to perform these steps, see the tutorial on installing the appliance for detailed instructions.
When you are done, you can log into the appliance dashboard using https://your-machine-address with your Ubuntu SSO account.